

|
|
Version

Table of Contents
1.2 What do you need to understand this book 4
4 UOMs (Units of Measurement) 14
5.2.1 Assigning Prices to Price Levels 18
5.2.2 Assigning Products to Price Levels 22
5.2.3 Assigning Accounts to Price Levels 23
5.2.5 Sample Price Level Sales 25
5.3.1 Pricing Rule LowestPrice 26
5.3.2 Pricing Rule Precedence 27
6.1 Widget A and Widget B with standard pricing 29
List of Figures
Figure 1: Sample data – 2 products, 2 price levels, 5 base prices 10
Figure 2: Wizard New Product 11
Figure 3: Class Diagram product1.AbstractProduct 12
Figure 4: Class Diagram product1.Products 13
Figure 5: UOMs of the Root Segment 14
Figure 6: Class Diagram uom1.Main 14
Figure 7: Class Diagram product1.Prices – ProductBasePrice 15
Figure 8: Widget A with 3 different Base Prices 16
Figure 9: Class Diagram product1.PriceLevel 17
Figure 10: Sample data – 2 products, 2 price levels, 5 base prices 17
Figure 11: Class Diagram product1.Prices – PriceLevel 18
Figure 12: Product Widget A and its prices 19
Figure 13: Class Diagrams product1.ProductFilter / PriceLevelProductFilter 22
Figure 14: Class Diagrams product1.PriceLevelAccountFilter 23
Figure 15: Class Diagram account1.AccountFilter 23
Figure 16: Class Diagrams product1.PriceList 24
Figure 17: Price Level Sales with Price List 25
Figure 18: Pricing Rule Lowest Price 26
Figure 19: Calculation Rule Default 28
List of Listings
1 About this Book
This book is designed to help you understand some basic concepts of the openCRX package product1, which allows you to design, configure, and manage complex products and their prices.
1.1 Who this book is for
The intended audiences are openCRX administrators and openCRX users.
1.2 What do you need to understand this book
A basic understanding of how to read UML diagrams.
1.3 Tips, Warnings, etc.
We make use the following pictograms:
|
|
Information provided as a “Tip” might be helpful for various reasons: time savings, risk reduction, etc. - it goes without saying that we advise to follow our guides meticulously
meticulous \muh-TIK-yuh-luhs\,
adjective: |
|
|
You should carefully read information marked with “Important”. Ignoring such information is typically not a good idea. |
|
|
Warnings should not be ignored (risk of data loss, etc.) |
2 Prerequisites
If you intend to reproduce the examples given in this guide, you might want to make sure you have a access to a working instance of openCRX. For detailed information on how to setup/install an openCRX instance, see http://www.opencrx.org/server.htm for more information.
Enter the sample data as explained below.
2.1 Sample data
With the following steps you can enter the test data used in this guide:
launch your browser, connect to openCRX, and login as user guest
navigate to [Products]
in the grid tab [Active Price Levels] select New > Price Level and then enter values as follows to create the Price Level Standard:
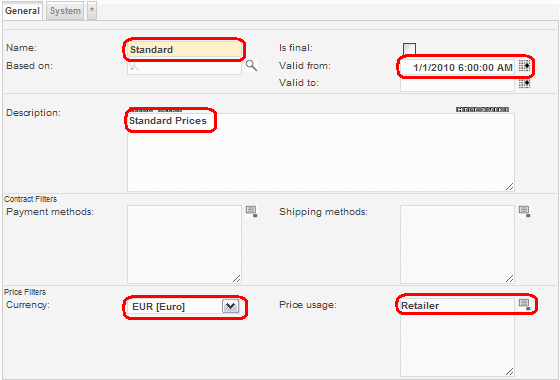
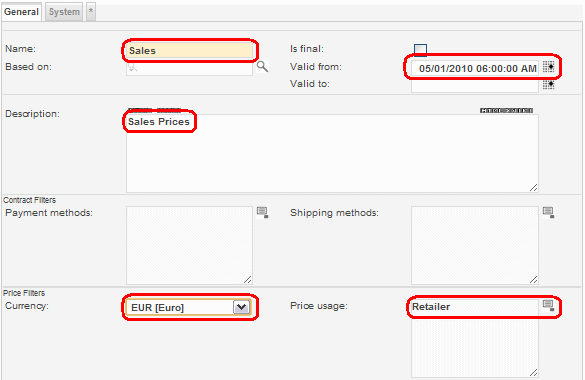
click [Save] to complete the creation of the Price Level Standardselect New > Price Level again and then enter values as follows to create the Price Level Sales:
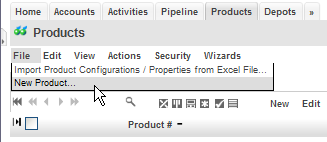
click [Save] to complete the creation of the Price Level Salesstill in [Products], select the Operation File > New Product to launch the product creation wizard:
enter data as shown below and then click [Save] to create the Product Widget A:
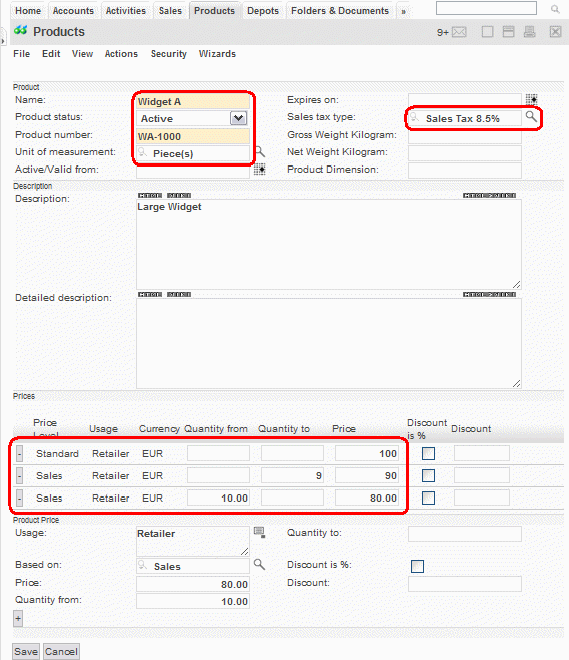

Use the auto-completer feature of openCRX to populate the fields Sales tax type and Based on (type the first few characters and then select the appropriate value from the drop down). To populate the field Unit of measurement you must use the lookup inspector (i.e. click on the lookup icon and then navigate to [UOMs (Root)] and select Piece(s) from the available UOMs); the autocompleter searches in the current segment (Standard) only and will not be able to find Piece(s).
If you started out with an empty database you might have to create a Sales Tax Type yourself; the database provided with the openCRX installer includes a sample Sales Tax Type Sales Tax 8.5% already.
product Widget A should look as follows and have 3 base prices:
navigate back to [Products] and select the Operation File > New Product again to launch the product creation wizard
enter data as shown below and then click [Save] to create the Product Widget B:
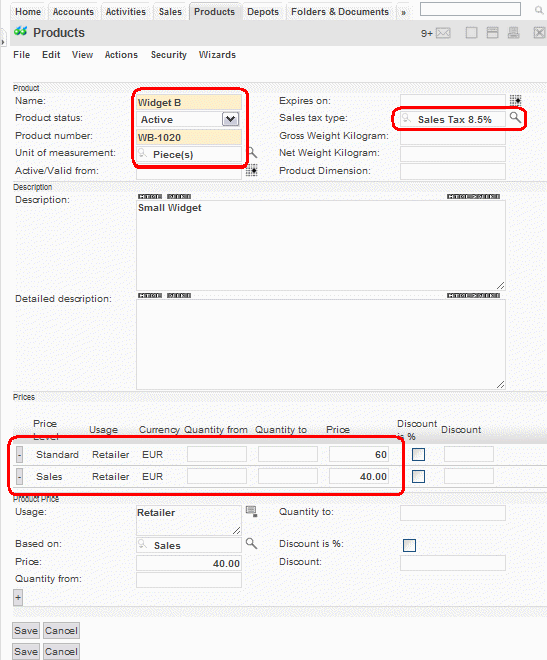
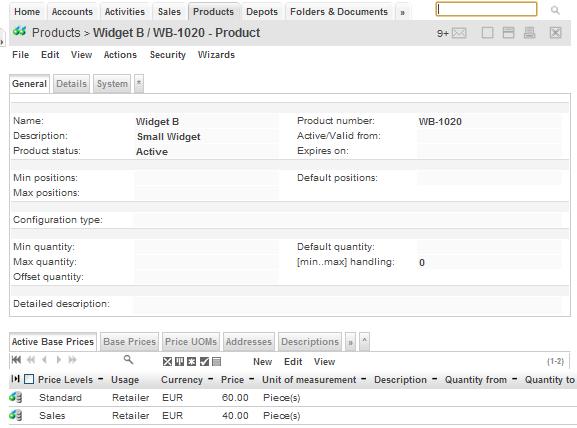
Product Widget B should look as follows and have 2 Base Prices:
The following figure shows an overview of the sample data created by the above steps:
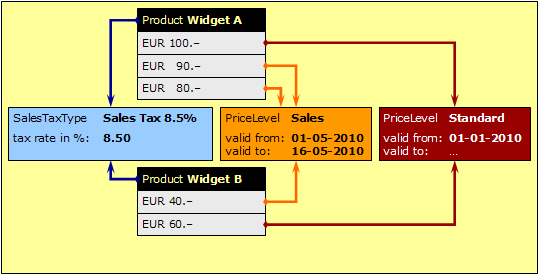
Figure 1: Sample data – 2 products, 2 price levels, 5 base prices
3 Products
openCRX products are objects that typically fall into one of the following categories: goods, services, ideas, etc. While the default customizing of openCRX enables many attributes useful for goods (like for example weight and dimension information) it is easily possible to tailor the list of available and/or visible attributes to your specific requirements with customizing.
openCRX provides a wizard that helps you create new products interactively and populate the various attributes including price information. The wizard New Product is available from the product segment in the File menu:
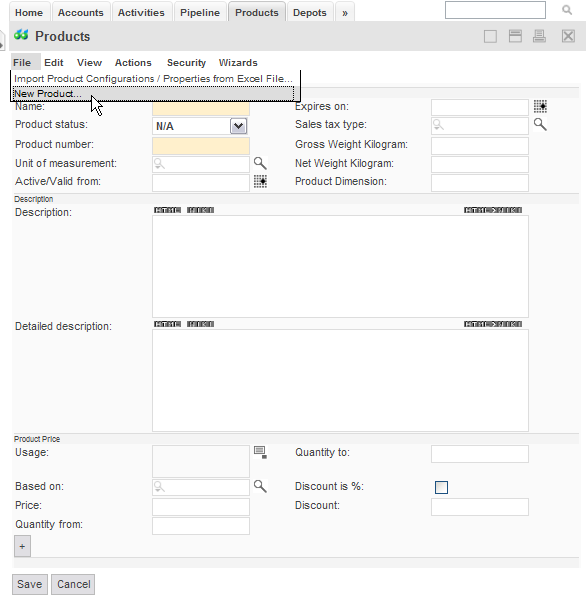
Figure 2: Wizard New Product
3.1 AbstractProduct
AbstractProduct is one of the core classes (all the relevant class diagrams are all located in the package org.opencrx.kernel.product1), but it contains only the most basic attributes. On the other hand, AbstractProduct inherits a lot of attributes from other classes, including CrxObject (and hence, it is very easy to add/enable additional attributes by customizing).
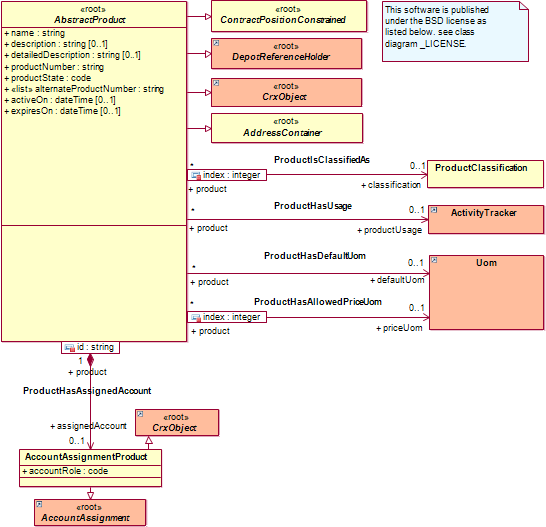
Figure 3: Class Diagram product1.AbstractProduct
For information on how to “attach” prices to products, see chapter 5 Basic Pricing.
3.2 Product
openCRX Product inherits from AbstractProduct and introduces additional concepts like
Product Configurations
Product Structuring (by means of relating products to one another)
Product Phases
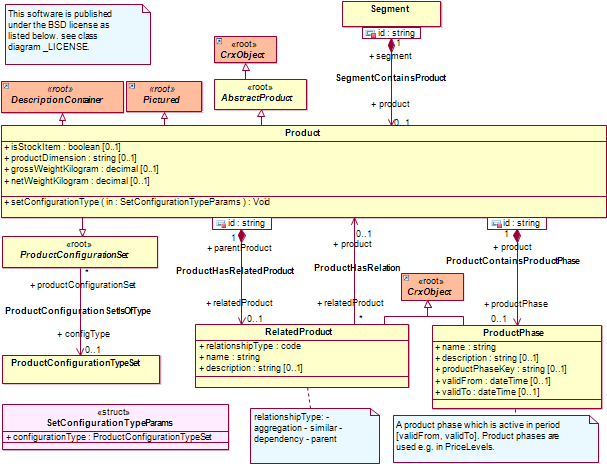
Figure 4: Class Diagram product1.Products
4 UOMs (Units of Measurement)
openCRX UOMs are what you would expect them to be: any division of quantity accepted as a standard of measurement or exchange. openCRX includes a variety of typical UOMs in the Root segment (but it is straight-forward to define your own UOMs):
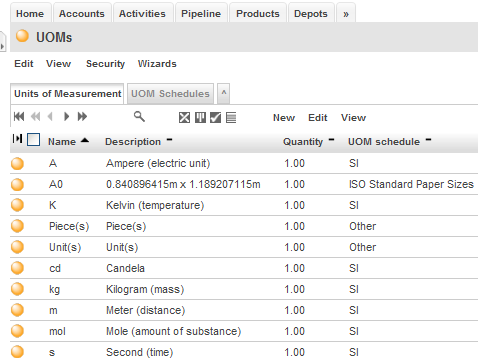
Figure 5: UOMs of the Root Segment
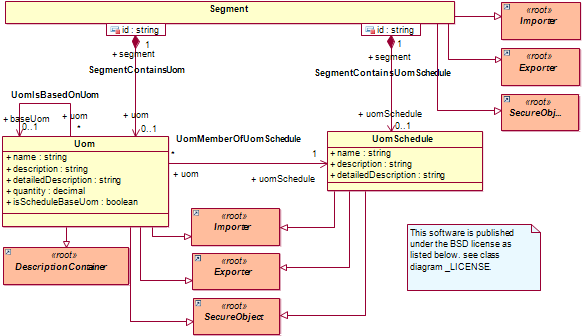
Figure 6: Class Diagram uom1.Main
5 Basic Pricing
In this chapter we will present a high-level overview of how product pricing works in openCRX. The relevant class diagrams are all located in the package org.opencrx.kernel.product1 (AbstractProduct, PriceLevel, PriceList, and PricingRule).
5.1 Prices of Products
The following class diagram excerpt shows the classes and associations that are relevant for “attaching” prices to products:
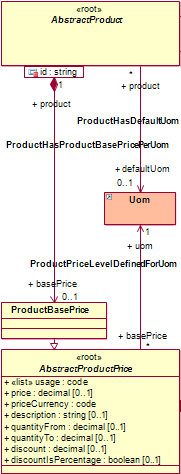
Figure 7: Class Diagram product1.Prices – ProductBasePrice
There are a few things to note:
you can attach any number of prices (called ProductBasePrice) to a Product (including no prices at all, i.e. prices are optional)
currency (priceCurrency), usage and unit of measurement (uom) should be specified for each price
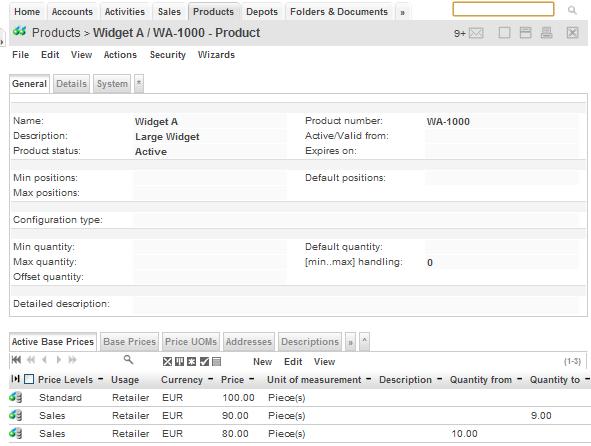
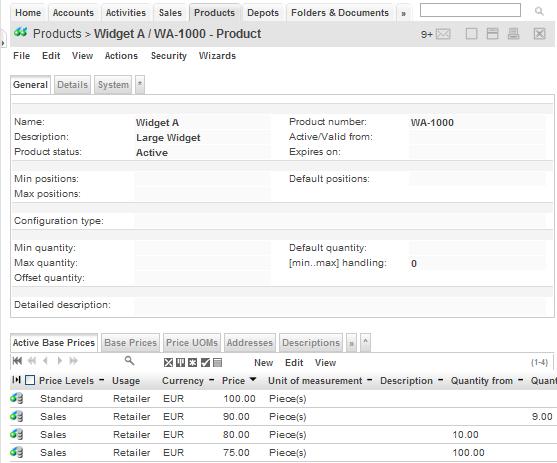
The following figure shows an example Product Widget A with 3 different Base Prices:
Figure 8: Widget A with 3 different Base Prices
The price of EUR 100.– is valid for any quantity and linked to the PriceLevel Standard, while the price of EUR 90.– is valid for quantities up to 9 pieces (linked to the PriceLevel Sales) and the price of EUR 80.– is valid for quantities of 10 and more pieces (and also linked to the PriceLevel Sales).
|
|
Please note that Base Prices “inherit” information like the validity range from the Price Level they are linked to. |
5.2 Price Levels
PriceLevels are very useful constructs to combine products and their prices and to define the period of validity for prices (think of price lists). With PriceLevels you can also establish relationships between accounts and prices, e.g. define which accounts are eligible for which prices. In addition to these basic “features”, price levels also offer a variety of operations to highly automate the management of product prices and price lists in even the most complex environments.
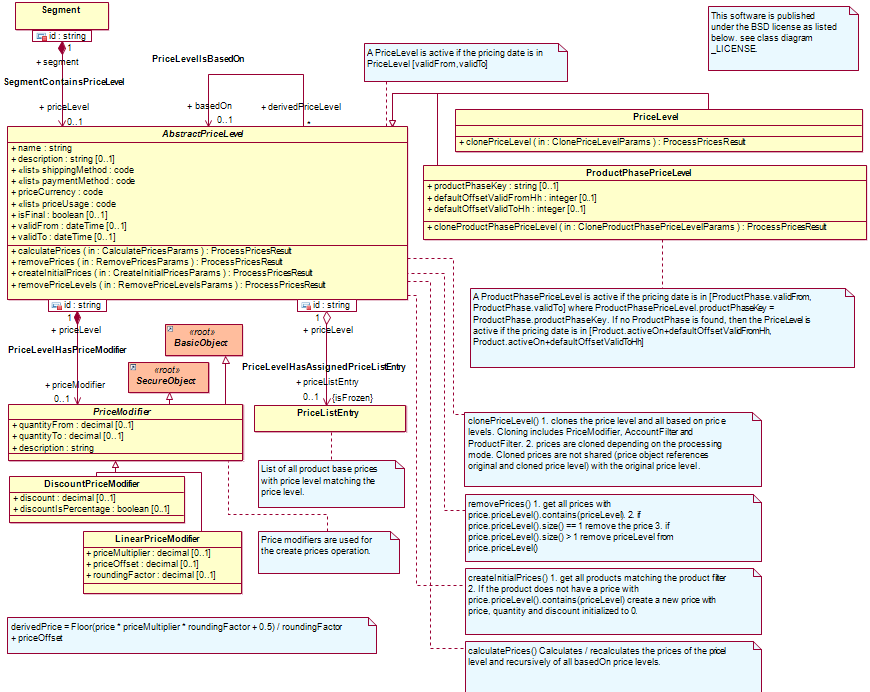
Figure 9: Class Diagram product1.PriceLevel
Next, we will discuss how products, prices and accounts can be “linked” to price levels, based on this sample data (see chapter 2.1 Sample data):
Figure 10: Sample data – 2 products, 2 price levels, 5 base prices
5.2.1 Assigning Prices to Price Levels
The following class diagram excerpt shows the classes and associations that are relevant for “assigning” prices to PriceLevels:
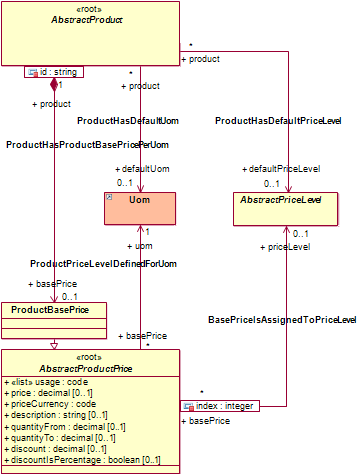
Figure 11: Class Diagram product1.Prices – PriceLevel
There are a few things to note:
you can assign a particular price to any number of price levels (and assigning prices to price levels is actually optional)
prices do not have a date validity range as date validity ranges (valid from, valid to) are defined by price levels
the currency of a price must be in agreement with the currency of the price level the price is linked to
the default pricing rule (lowest price) requires that the usage(s) of a price and the respective price level must be in agreement
you can (optionally) define a default price level for each product
While you can assign prices to price levels manually, such assignments (or even the calculation of prices to be assigned) is typically done in an automated manner, e.g. by means of executing operations like Create Initial Prices.
Let us have a look at the product Widget A:
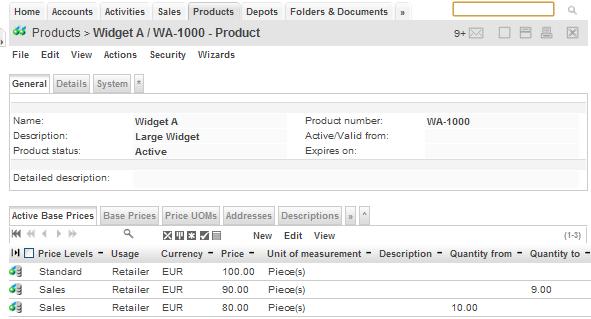
Figure 12: Product Widget A and its prices
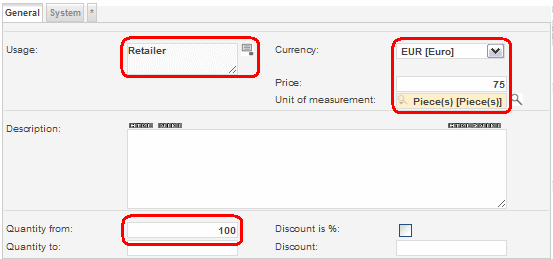
This product has 3 Base Prices, 1 linked to the Price Level Standard and 2 linked to the Price Level Sales. Not that the sales price depends on the quantity, i.e. up to 9 pieces the price is EUR 90.--, for 10 pieces and more the price is EUR 80.--. Let us now add another sales price that applies to quantities of 100 or more pieces:
in the grid [Base Prices] select the menu New > Product Base Price and then enter data as shown below:
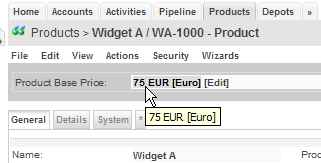
click [Save] and then click on the newly created Product Base Price as shown below to navigate to it:
in the grid [Price Levels], enter a reference to the Price Level Sales (use the auto-completer) as shown below:
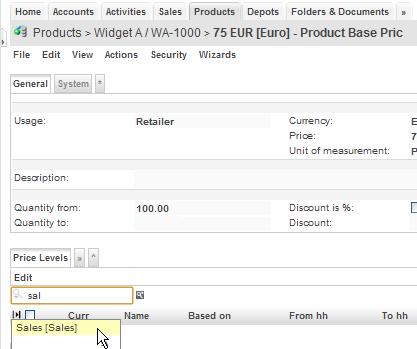
select Edit > Add Object as shown below:
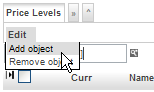
the newly added reference to the Price Level Sales should now be shown in the grid [Price Levels] of this new sales price:
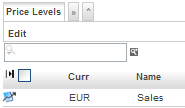
navigate back to the Product Widget A and verify that the new sales price of EUR 75.-- for quantities of 100 or more does actually show up in the grid [Base Prices]:
5.2.2 Assigning Products to Price Levels
On the one hand products are assigned to price levels implicitly by manually assigning product prices to price levels. More interestingly, however, is the use of product filters to automatically “assign” products to price levels:
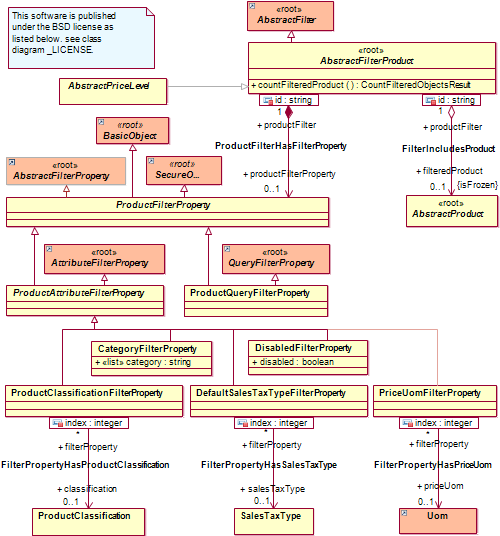
Figure 13: Class Diagrams product1.ProductFilter / PriceLevelProductFilter
The shared association filteredProduct yields all products that are assigned to a particular price level based on the defined product filters (or all products in case no filters are defined). This construct (combined with various price level operations) enables you to create price lists based on product criteria in a highly automated fashion.
If you create a new Price Level, there is (by default) no product filter defined. In the absence of a product filter, the grid [Products (Filtered)] of a Price Level includes all products.
5.2.3 Assigning Accounts to Price Levels
You can manually assign accounts to price levels with AccountAssignments. Such account assignments also allow you to define discounts that apply to a particular account only:

Figure 14: Class Diagrams product1.PriceLevelAccountFilter
Account filters allow you to automatically “assign” accounts to price levels:
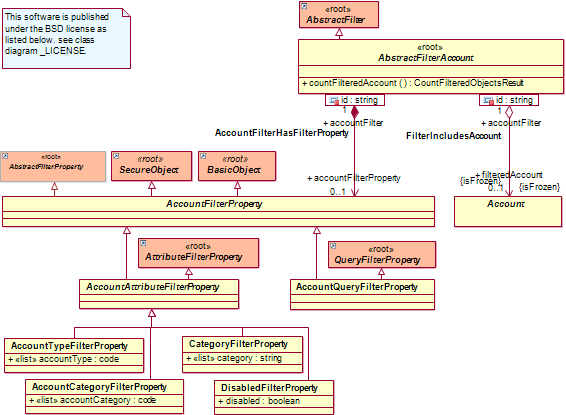
Figure 15: Class Diagram account1.AccountFilter
The shared association filteredAccount yields all accounts that are assigned to a particular price level based on the defined account filters (or all accounts in case no filters are defined). This construct (combined with various price level operations) enables you to create account-specific price lists highly automated.
If you create a new Price Level, there is (by default) no account filter defined. In the absence of an account filter, the grid [Accounts (Filtered)] of a Price Level includes all accounts.
5.2.4 Price Lists
In addition to the “global price list” (the price list containing all product prices in any currency) openCRX provides a Price List for each Price Level. Such a price list contains all product prices that are assigned to the particular price level.

Figure 16: Class Diagrams product1.PriceList
Please note that price lists are derived information, i.e. you do not explicitly define price lists, but rather you assign product prices (or products with prices) and accounts to price levels (see sections Assigning Products to Price Levels and Assigning Accounts to Price Levels for details).
5.2.5 Sample Price Level Sales
The following figure shows the Price Level Sales with the respective (derived) Price List:
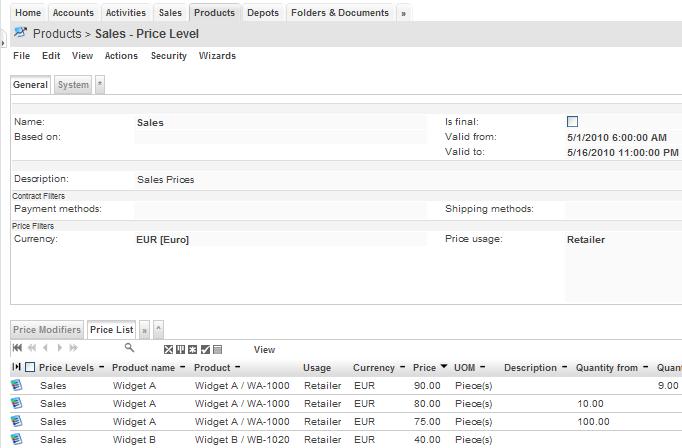
Figure 17: Price Level Sales with Price List
5.3 Pricing Rules
Pricing rules are used to automatically determine an appropriate price level for a contract position based on any algorithm you like (e.g. “select the price level with the lowest price a particular account is eligible for” - see section Pricing Rule LowestPrice for details). Pricing rules are basically "scripts" that are programmed in Java and have access to the complete API of openCRX (and anything else that is available, including third-party systems like billing systems, etc.); the scripts are compiled on the fly at runtime (we use Janino - http://www.janino.net/ - an embedded Java compiler) for maximum flexibility, i.e. scripts can be added/modified/deleted at runtime!
5.3.1 Pricing Rule LowestPrice
openCRX provides a sample pricing rule called Lowest Price:
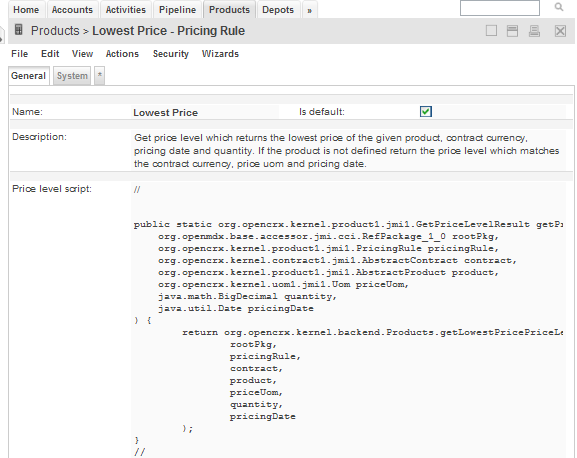
Figure 18: Pricing Rule Lowest Price
In a nutshell, here is how this pricing rule determines the price level with the lowest product price given a contract (e.g. a quote or a sales order, which also defines the customer [= account] and a contract currency), a product (on each contract position), and optionally a quantity (useful for quantity-based pricing), a pricing date (useful for look-back or forward pricing) and a unit of measurement for the price:
determine candidate price levels such that
pricing date is within validity range of price level
contract currency matches currency of price level
customer is assigned to price level (manually with an account assignment or implicitly with an account filter)
product is assigned to price level (manually by assigning product price to price level or implicitly with a product filter)
determine price level with lowest product price by checking relevant prices (matching usage, including discounts) of all candidate price levels
5.3.2 Pricing Rule Precedence
Pricing Rules can be defined both at the Contract level and at the ContractPosition level. The following rules apply:
Specifying a PricingRule is optional at the time of creating a new Contract. If no Pricing Rule is specified, the respective field simply remains empty.
Specifying a PricingRule is optional at the time of creating a new ContractPosition (with the operation Create Position). If no Pricing Rule is specified, then the Pricing Rule of the Contract (if specified) is assigned to the newly created Contract Position; if there is no Pricing Rule specified at the Contract level, then the default Pricing Rule (if specified) is assigned to the newly created Contract Position. If no default Pricing Rule is specified then the respective field simply remains empty.
Automated pricing of a ContractPosition requires that a PricingRule is assigned to the respective Contract Position (either automatically or then manually). Contract Positions without assigned Pricing Rules cannot be (re)priced automatically and their pricing status remains “dirty”.
Automated pricing of a Contract requires that all of its Contract Positions can be priced automatically. If at least 1 Contract Position cannot be priced automatically (i.e. its pricing status remains “dirty”) then the Contract cannot be priced automatically and its own pricing status is set to “dirty” as well.
|
|
Properly assigned Pricing Rules are no guarantee that a Contract and its Contract Positions can be automatically priced. Automated pricing also requires that at least 1 valid price is available, i.e. a price with matching currency that is assigned to a valid PriceLevel (i.e. pricing date of Contract or Contract Position within validity range of PriceLevel), etc. |
5.4 Calculation Rules
Calculation rules are used to control the way prices are calculated in terms of rounding, number of significant decimals, etc. Calculation rules are basically "scripts" that are programmed in Java and have access to the complete API of openCRX (and anything else that is available, including third-party systems like billing systems, etc.); the scripts are compiled on the fly at runtime (we use Janino - http://www.janino.net/ - an embedded Java compiler) for maximum flexibility, i.e. scripts can be added/modified/deleted at runtime!
Calculation Rules can be defined both at the Contract level and at the Contract Position level.
openCRX provides a sample calculation rule called Default:
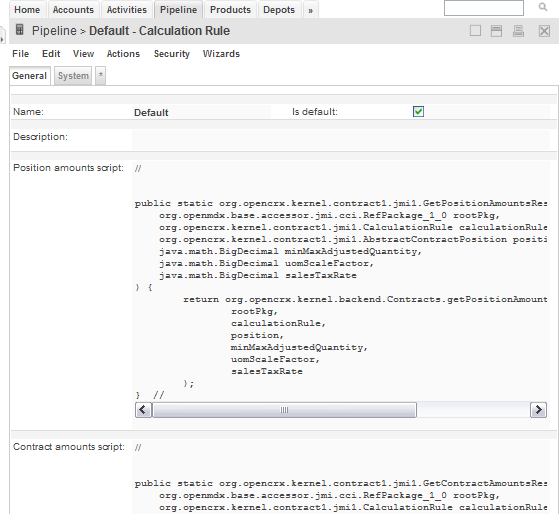
Figure 19: Calculation Rule Default
6 Some Examples
In this chapter we create some samle contracts and contract positions based on the sample data (see chapter 2.1 Sample data) and the additional sales price of EUR 75.-- for Widget B (created at the end of chapter 5.2.1 Assigning Prices to Price Levels) to show how this all fits together.
6.1 Widget A and Widget B with standard pricing
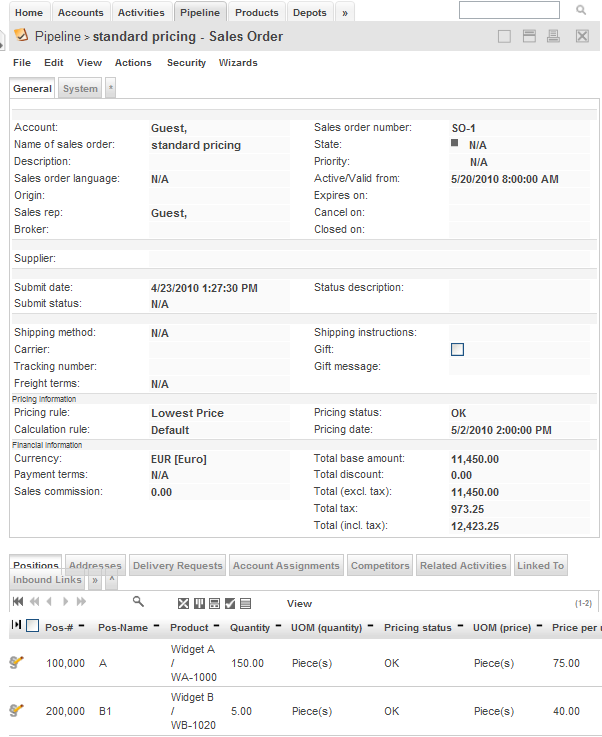
Let us create a sales order with 2 positions as follows:
navigate to [Sales]
execute File > New Sales Order and populate at least the fields Contract name, Account, Active/Valid from, Currency and Contract number in the first field group and then enter a delivery and billing address in the second field group:

|
|
Please note that the Active/Valid from date should be later than 1 Januar 2010, but outside of the period 1 May 2010 through 16 May 2010 as this ensures that positions are priced with the price level Standard as defined by our sample data. |
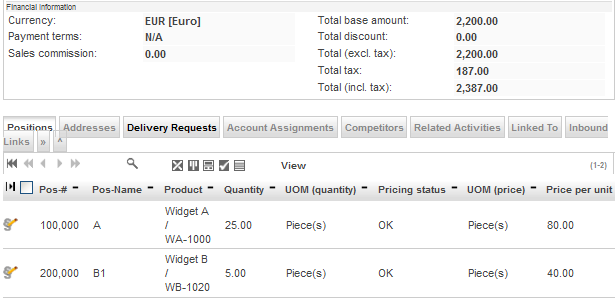
next we add a position with 25 Widgets A as follows:
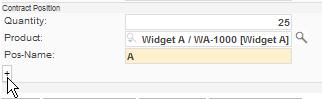
click on the button [+] to add this position A and verify that the price was (automatically) set to 100:
next we add a position with 5 Widgets B as follows:
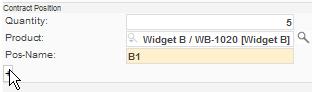
click on the button [+] to add this position B1 and verify that the price was (automatically) set to 60:

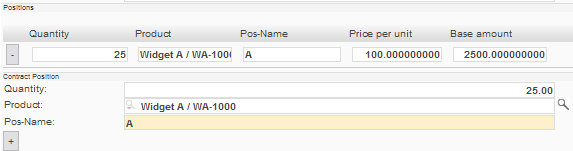
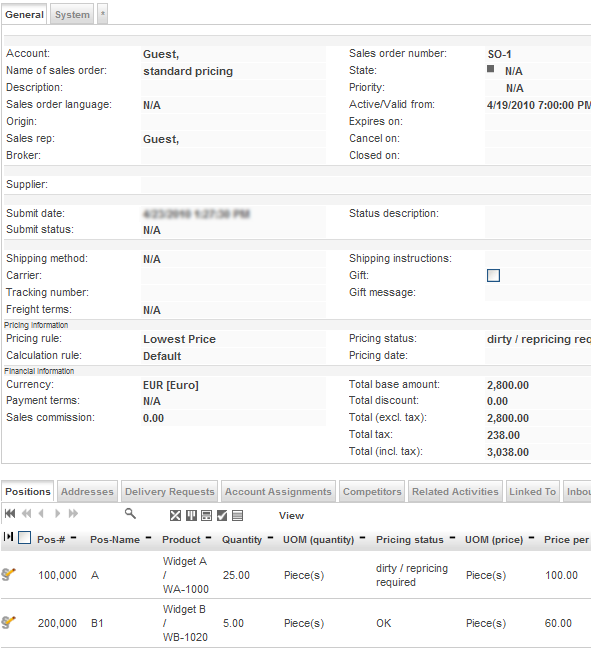
click on the button [Create Sales Order] to create this sales order
your newly created sales order should look as follows:
|
|
Please note that the wizard does not set the Pricing date. Please note that pricing of the sales order positions (and hence the sales order is based on the value of the attribute Pricing date (if set!); if Pricing date is not set, then the pricing is based on prices applicable on the sales order's Active/Valid from date. You can reprice the sales order at any time by executing the operation Actions > Reprice. |
6.2 Pricing per Pricing date or Active/Valid from date
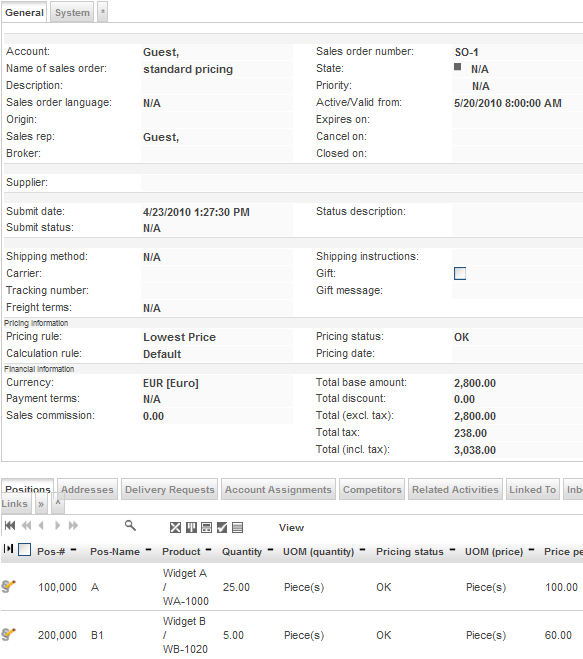
Let us continue with the sales order created in the previous chapter 6.1 and see what happens if we change the Pricing date:
navigate to the sales order named standard pricing and change into edit mode (execute Edit > Edit)
set the Pricing date to 5/2/2010 2:00:00 PM and then click [Save]:
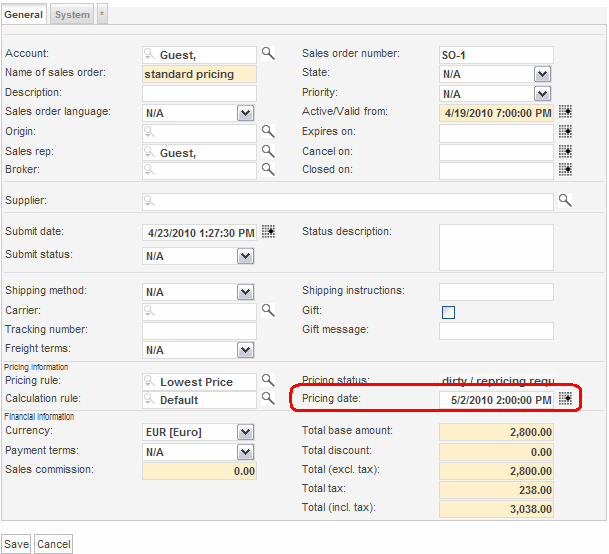
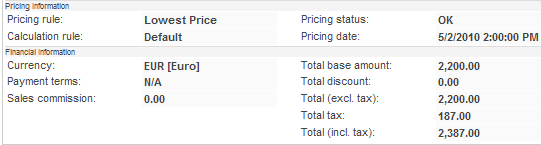
execute Actions > Reprice and verify that the prices per unit dropped to 80.00 for Widget A and to 40.00 for Widget B, i.e. setting the pricing date to a date inside the sales period (1-May-2010 through 16-May-2010) causes the lowest price algorithm to pick the sales prices. At the contract level all the totals were automatically recalculated as well:
Let us now continue with this sales order and see what happens if we change the Active/Valid from date:
navigate to the sales order named standard pricing and change into edit mode (execute Edit > Edit)
set Active/Valid from to 5/20/2010 8:00:00 AM and then click [Save] (the Pricing status changes to “dirty / repricing required”)
execute Actions > Reprice and verify that the prices did not change (because Pricing date overrides Active/Valid from), but the Pricing status was set to OK:
6.3 Volume Discounts
The sales price of Widget A is prepared for volume discounts, that is in quantities up to (and including 9) the price is EUR 90.00, in quantities from 10 to 99 the price is EUR 80.00, and in quantities of 100 or more the price drops to EUR 75.00:

Let us now change the quantity of the position with Widget A from 25 to 150:
navigate to the sales order named standard pricing and change into edit mode (execute Edit > Edit)
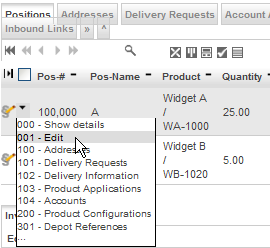
in the Grid [Positions], hover your mouse over the area just to the right of the position icon and once the context menu shows up select the entry Edit to load the respective position with Widget A in edit mode:
change the quantity from 25 to 150 and then click [Save]:
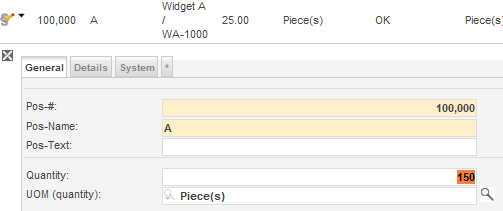
execute Actions > Reprice and verify that for Widget A the price per unit changed from 80.00 to 75.00: (and the totals of the sales orders were also recalculated):
Finally, let us clear the Pricing date and see how that effects the prices:
navigate to the sales order named standard pricing and change into edit mode (execute Edit > Edit)
set Pricing date to empty (by deleting the value in the input field) and then click [Save] (the Pricing status changes to “dirty / repricing required”).
execute Actions > Reprice and verify that the prices are changed back to standard prices (because Active/Valid from does not fall into the range 1-May-2010 to 16-May-2010), i.e. Widget A is priced at EUR 100.00 per unit and Widget B is priced at EUR 60.00 per unit:
7 Useful Wizards
You might want to have a look at some of the wizards included in the standard distribution of openCRX if you want to learn about how to program against the openCRX API and make use of the built-in business logic:
CreateContractWizard.jsp
CreateLeadWizard.jsp
CreateProductWizard.jsp
8 Next Steps
You might want to have a look at some of the additional documentation published at http://www.opencrx.org/documents.htm.
License
The contents of this file are
subject to a BSD license (the "License"); you may not use
this file except in compliance with the License. You may obtain a
copy of the License at http://
Copyright 2010 ©
CRIXP Corp. All rights reserved. ![]()